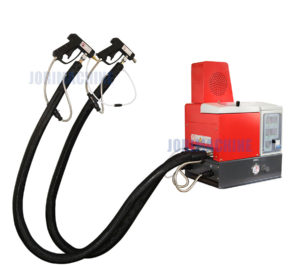
The glue gun has been tested before leaving the factory and can be installed and used immediately. Each glue gun has a solenoid valve to control the air supply. Since the glue gun switch speed is extremely fast, the solenoid valve should be installed as close as possible to the glue gun and keep the distance consistent. Solenoid valves and corresponding water filtration regulators are available.

The solenoid valve can be controlled by the melter controller compensator or the melter high speed or travel switch, and the contacts and eyes should be mounted in an adjustable position.

The glue gun can be installed in the position required by the main machine. The glue gun body mounting bracket is 16mm diameter mounting hole and fastened with M6 bolts. The glue gun body is equipped with a filtering device and a fine adjustment function of the spray amount. The observation hole in the middle of the nozzle can check the working condition of the nozzle and the sealing is good. The general application is that the surface of the nozzle and the object should not exceed 60 mm.

Gun and hose connection: Connect the gun to the hose with two sets of wrenches (90°, 45°, 180° joint).
Connect the gun electrical connector to the hose electrical connector.

Connect the four-way solenoid valve to the electric circuit of the spray gun. When the spray gun is required to be closed, the compressed air will pass from the solenoid valve to the B port. When the solenoid valve acts, the compressed air will open to the A port, and the spray gun will open. The air pressure is 5-8 kg/ Square centimeter.

Check that the gun temperature can be read by the host temperature. A thermometer can be used to check the surface temperature of the gun.
Exclude the air and protective oil in the spray gun, heat the spray gun, unscrew the spray gun nozzle, lower the receptacle, add the appropriate amount of hot melt adhesive to the fuser, and open the hot melt machine power supply. When the temperature reaches the normal working temperature, manually start the gear pump. Open the solenoid valve manually, and discharge the air and oil in the gun body until all the hot melt glue is sprayed out.

Install the nozzle. Try hot melt adhesive and check if it is good.
Now It’s Your Turn
I hoped you enjoyed my detailed information for glue gunbusiness.
Now I want to hear from you:
Which parts from this post are you most excited to know ?
Are you going to know more other kinds of related products? Or do you want to do deep research on this line?
Let me know by leaving a quick comment.


